Showing posts with label Coffee Cup HTML Editor. Show all posts

Saturday, April 20, 2013

Setting up web editors

Trying out web editors

Any time you try out a new editor make sure the software knows where your Master Website folder is located… all of the programs will work better if you set up the master local site first.

Here's some help with the Coffeecup editors

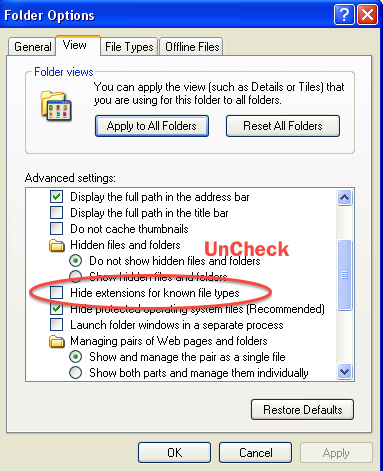
But, First: Make Extensions visible in WindowsXP, Vista, Win7 or Win 8

Mac and Windows OS's by default hide the 3 letter file extension for all files…  the extensions are part of the filename, the extensions tell web browsers to do with the file… Here's how you set that up…

On Windows XP

  • Open My Computer, and select Folder Options from the Tools menu
  • Don't see Menu's, press the Alt key
  • Click on the View tab, turn off Hide MS-DOS file extensions for known file types, by unchecking the box
  • Press OK.

On Windows Vista

    • Go to My Computer and choose Organize > Folder and Search Optionsv
    • Select the View tab and deselect "Hide extensions" for known file types
    • Press OK.

On Windows 7

  • Open an Explorer window and choose Organize > Folder and Search Options
  • Select the View tab -- and deselect the Hide extensions for known file types
  • Press OK.

Same for Win 8

Folderview

Making Extensions visible in OS X (Mac)

Finderprefs

  • open the Finder, then choose Menu Finder > Preferences
  • Choose the Advanced Tab
  • Check the Show all file extensions box


The extensions to tell us and the browsers which files are web pages, graphics or scripts)  The extension for a web page is .html or .htm Use one to the other, but be consistent! Graphic or picture files recognized by a browser use the extensions .jpg, .png or .gif, a new member of the graphic family is .svg.  Script files usually have the extension .css, .php, .js, or .cgi (there are many others).

Setting up Windows Coffee Cup Web Editor

The files in Your-Master-Site folder are called "Local" files, these file will eventually be uploaded to your "Server". The files located at the server are called "Remote" files

You can setup The CoffeeCup HTML editor using the menu item

My Websites > Website Project Settings…

You'll see this requester (If you need further help click the question mark)

MywebsitesProject settings


1. Give the project a name   2. Use the "browser" to locate Your-MasterWebsite folder on your flash drive

That's all you need to do for now. We'll set up the servers later…

In Coffeecup you'll see what's in the Local site folder on the left.

Windowsditor


Setting up a Mac for Coffeecup's Web Editor

It's a bit easier ???

In the Web Editor choose the menu item

File > New Project  > From Files and Folders

You'll get a Finder requester… Browse to your Local Site folder on your Flash Drive

But, title your project first…

Layout005

Then open the local site folder

and click next

Layout006

Highlight the files you want to edit or open and click okay

Your Web Editor will look like this… (well sorta… )

Layout007

and have fun!

We'll go over this in class… When we are ready we'll link your web editor to your hosting server!


Friday, April 19, 2013

Welcome to How to Create A Website

Web Browsers (Test Early, Test Often)

Turns out Apple Dropped support for the Window's version of Safari.  There is a version available, but it was last updated in July of 2012… 

If you have a PC, to test your web page to see what it looks like on an Apple Computer using Safari, you can use a Web Site teasing service at Sauce Labs https://saucelabs.com

This links takes you to a list of Web Browser publishers Download browsers! Install them!
  1. The Web Editors

    If you already have a Web Editor, by all means, use it! The following is a link to a web page that discusses the various kinds of web editors and give you some choices. The goal here is to find a web editor that you like, and that will help you build your web site. The Web Editors

    We'll start of using the HTML editors from Coffee Cup so you can get familiar with how html editors work..  You can always download and use these editors for free for 30 days or so…

    Windows:  Coffeecup HTML Editor

    Mac:  CoffeeCup HTML Editor

    Homework:  

    The write out Content and or ideas you want to see on your web pages…

    You can start off with a pencil and paper!… Then write it out in a text editor. 

    Go a head and install one of the above and try using it to write out your content…

    Save the file as a .txt file and put it in your master website folder. We'll use it in class…

     Most of all have fun! Get stuck, send an e-mail…

    Navigation Links for what was discussed in class

    • Week 1 (That's this page on my web site at the bottom of the page you'll see an RSS News feed that displays links to the last 5 articles on the class website blog)
    • Home   (Class Portal page)
    • Lesson 1 (Interesting stuff)
    • Domains and Hosts
    • Resources 
    • Contact

    Some Vocabulary 

    URL ---Uniform Resource Locator
    HTML & CSS
    --- HTML, Hyper Text Markup Language, creates the headings, paragraphs and other content for  a web page.
    --- CSS, Cascading Style Sheets, Creates the Styling for a web page.
    Provider
    --- Physically links your computer to the Internet.
    Host
    --- Provides the Computers (servers) to store and host your web site on the internet.
    Domain Name (Server) (DNS)
    --- makes a recognizable name for the actual numerical Internet address.
    Got a question? Send me an e-mail

Thursday, November 08, 2012

Week2 Review --Create a Website Class

Class Objective

To build a web site consisting of at least 3 interactive web pages.

This weeks Goal

  • --Add content and format  with xhtml
  • --Adding images to a web page

The xhtml rules

Before you can add html elements to a web page you need to know the rules!

http://uofgts.com/BasicWD/xhtml.html

Oh no, more rules! A few more things you need to know!
TYNTK

Add your content for your web page using the Web Editor of your Choice

Use this blank html5 page 

Basic Blank HTML5 Page 

When this above page loads in the browser, view the source, and copy it.

Paste it into a blank page in your web editor.

Then add your content in the order you want to see it displayed on the page

How? The following web page is a tutorial on how to add content and format it.

Just follow the steps and instructions. Got a question, send me an e-mail!

Building a Web Page-- How to add and format the content

(You will find the above web page in the class folder named week2… )

If you didn't attend the class, when the above page loads in the browser use the view source menu to copy the page and paste it into a blank page in your web editor.

HomeWork

after you do the above tutorial work on the following

1. Insert your content into an html5 wireframe
html5-3col.html

or
html5-2colindex.html

Those two files are already in your master folder!

2. Play with Sumo Paint and Make an image or graphic or logo

AND add it to your web page content!

An Image editor for everyone… SumoPaint

A free online paint program 

3. How to Insert an image on a web page

How to Insert an Image


Most of all have fun!

Wednesday, May 09, 2012

Welcome to How To Build a Website!

Our Objective

  • To build a web site consisting of at least 3 web pages.
  • Acquire a domain name
  • Sign up with a HOST

How?

Discussion
Domain Names and registration
Signing up with a host

Domains and Hosts

What's the most important "THING" on a web page? What are the main parts of a web page?

Can you List them?

Write THEN CHECK OUT THIS LIST...

How do you put a web page together?

  1. The Content First
    • Create it with a text editor
    • Later we will mark it up with xhtml/html5 in your web editor
  2. The Layout
    • Will be Created with CSS3 in your web editor
  3. The Style
    • Will be Created with CSS3 in your web editor

Web Page Creation: The Preparation

You'll need 2 folders on YOUR flash drive and/or Home computer

  1. Make a "Master" website folder
      1. Name it with "Your name" something like "Garry-MasterWebsite"
        1. This folder only contains the files that makes your website work.
      2. And Make A "Webstuff" folder.
        1. This folder will contain the parts you collect to make your website...
          1. Things like, IDEAS, Text files, widgets, lists of links, graphics, pictures, videos... etc...

    Web browsers

    Here's a list that links you to web browser publishing sites Download all the browsers! Install them!

    The Web Editors

    If you already have a Web Editor, by all means, use it! The following is a link to a web page that discusses the various kinds of web editors and give you some choices. The goal here is to find a web editor that you like, and that will help you build your web site. The Web Editors

    Homework:  Write the most important part of your web pages

    The Content
    Always write the content first as plain text with no formatting.

    You'll find some ideas at this web page that will help you "layout" your web page. Lesson 1: Penciling it out!


    Most of all have fun! Get stuck, send an e-mail…

    Navigation Links

    • Week 1 (That's this page on my web site at the bottom of the page you'll see an RSS News feed that displays links to the last 5 articles on the class website blog)
    • Home   (Class Portal page)
    • Lesson 1 (Interesting stuff)
    • Domains and Hosts Resources 
    • Contact

    Vocabulary 

    URL
    ---Uniform Resource Locator
    HTML & CSS
    --- HTML, Hyper Text Markup Language, creates the content of a web page.
    --- CSS, Cascading Style Sheets, Creates the Styling for a web page.
    Provider
    --- Physically links your computer to the Internet.
    Host
    --- Provides the Computers (servers) to store and host your web site on the internet.
    Domain Name (Server) (DNS)
    --- makes a recognizable name for the actual numerical Internet address.
    Got a question? 'Holler!

Monday, October 24, 2011

WYSIWYG --Visual Web Editors

Is there a way to edit a web page directly without using an html text editor? Is there a way to design a web page visually?

The answer is, YES! Sometimes a visual editor is real handy to have  around!

If you have purchased the Coffee Cup HTML Editor, you'll discover that it comes with a visual editor. You might not notice it as it might be "turned off!"  I found this "Faq" on the Coffee Cup web site.

Visual Editor Tab not displaying at all.

Solution: With the update to the latest version of the HTML Editor, the Visual Editor has been turned off by default. We did this to provide the best possible user experience. But don't fret — this is an easy issue to fix. To re-enable the Visual Editor, launch the Editor and go to the Tools > Preferences > General tab. Once there, uncheck the Hide Visual tab option...

Prefs visual


When you click on the Visual Editor Tab you can edit directly on the web page.

Insert HTML elements just like using a word processor...

Visual ed cp

Give it a try!

Coffee Cup has another Wed Editor that could be better described as a web designer.  It's called Visual Site Designer.

If you are visually oriented this might be a great editor for you.  You can download a free trial from Coffee Cup's web site

3207-coffeecup-visual-site-designer1.jpg


If you have a Mac (or a PC) you can try the Open Source program Kompozer (It's Free)

Click the link below to start the Download and give it a try.! Load a web page and start adding your content directly on the web page!


Kompozer


There is other software, noteablely Adobe's  Dreamweaver, but this class is not about web editors, it's about  creating a web site!

Web Editors are our tools of the trade!

Got a question,? 'Holler!