Thursday, June 13, 2013

Last Class is Over… Where to from here?

Take more classes

Keep trying out different Web Editors

Most software companies allow up to 30 day free trail periods for their software... Try them ALL out!

Finding a Web Editor

Any time you try out a new editor make sure the software knows where your Master Website folder is located… all of the programs will work better if you set up the master site first.


Subscribe to the latest News/blogs, Take On-Line Classes, Take another Clark Class

The following web sites are my favorite sources of information. They offer free classes, tutorials, resources, newsletters, the latest web news... join up, book mark these web sites! Subscribe to the Newsletters… 

http://www.campusce.net/clark/course/course.aspx?catId=172

http://www.sitepoint.com/blogs/?source=homepage

http://www.smashingmagazine.com/

http://webdesign.about.com/gi/pages/stay.html

http://www.sitepoint.com/newsletter/

Html5 Development Center


Lurk on Forums

An Internet forum, or message board, is an online discussion site about specific subjects or software. Members share information, and seek solutions to problems with the subject matter or specific software.
At some point you will be able to contribute to the forum by answering someones question!

http://www.sitepoint.com/forums/

http://www.coffeecup.com/forums/welcome/

http://forums.adobe.com/community/dreamweaver

You can find forums on just about any subject... just do a google search.

But, most of all, just build web pages, and…Have a great summer!

Practice, practice, practice


And should you have a question, 'holler anytime! I'm happy to help!

See you on the web!

Monday, June 10, 2013

How to Display Photographs and other images

A question was asked in class… How do you make photographs and graphics behave the way you want them to? I will go over this in class in detail…  If you have a question… bring it to class or send that e-mail!

Displaying Photographs

In order for your web page to render quickly you need to make your mega-pixel photographs "smaller." In other words resize the image to fit the designated size on the web page, however...

What about the new high resolution monitors? How do you maintain image quality when a high resolution monitor can display up to 4x as many pixels per inch??

css-device-bitmap-pixelsThe easiest answer is to double the resolution of the images being served. The draw back is that your users might be downloading up to 4x more data than they need. The upside is you only have to maintain one set of graphics or photographs.

W3C and and other web designers are working on this and have temporary solutions to this display issue... for more information check out these articles.


Friday, June 07, 2013

Review: Using CSS and SEO update

The External Style Sheet

An external style sheet is a text file that must have the extension .css

eg) "mystylesheet.css"

The HTML page using the style sheet must link to the style sheet with a link written

between <head>and </head>

<link rel="stylesheet" type="text/css" href="mystylesheet.css" />

where href is the path to the style sheet. So, if you put the style sheet in the folder css

the path is href="css/mystylesheet.css" 


The Embedded Style Sheet

CSS can also be embedded on the same page as the html
The styles must be between <head> and </head> 
and between
<style type= "txt/css" >
</style>

In-line styles

CSS can also be written "in-line" in between the <body> and </body>

<div style=" width:960px; height:100px; background-color:silver;">

CSS Priority ---The Order of Interpretation

#1 Priority is the Browser's default value... 
#2 The External Style sheet
#3 The embedded Style Sheet
#4 The in-line styles

Remember, you can style ANY html element

selector {property: value;}

Where:

The selector is:
*, Universal, applies to all elements
Any element
A class
An ID
An html5 semantic


Updated the links to W3C's Validation services

Tidy

If you need to convert a page to Xhtml/html5 or you are having trouble getting the page to look the way you want, Tidy may help you solve your problems

Tidy, well cleans up and fixes (if it can) your your markup. The validation and tidy services listed below are built into or linked to from most web editors

There are some older on-line services, like Tidy On-line, or Page Valet, might be useful to you...

Validate

The Basics - what you should run on all your web pages

The SEO page has also been updated


Friday, May 31, 2013

Web Design -- Font Relief

More Fonts for your web pages

You can never have enough fonts! --Anon

There are several ways to add "fancier" fonts to your web pages… other than the suggested Web Safe Fonts

  1. Use a font you already have on/in your computer, and hope that the "client" visiting your web page also has that same font on/in their computer!
  2. Another way is to use Public Domain Fonts that are "free" to use on your web page, and your clients can "freely" download them.  
  3. Use Web Fonts that are in the Public Domain
  4. Purchase Web Fonts from a font foundry.

 Fonts Common to ALL Computers

This is from the web site http://www.ampsoft.net/webdesign-l/WindowsMacFonts.html

See the web site for the notes attached to specific fonts

These fonts are common between the Mac and PC

Windows fonts / Mac fonts / Font family
Arial, Arial, Helveticasans-serif
Arial Black, Arial Black, Gadgetsans-serif
Comic Sans MS, Comic Sans MS5cursive
Courier New, Courier Newmonospace
Georgia1Georgiaserif
Impact, Impact5, Charcoal6sans-serif
Lucida Console, Monaco5monospace
Lucida Sans Unicode, Lucida Grandesans-serif
Palatino Linotype, Book Antiqua3Palatinoserif
Tahoma, Genevasans-serif
Times New Roman, Times New Roman, Timesserif
Trebuchet MS1Trebuchet MSsans-serif
Verdana, Verdana, Genevasans-serif
Symbol, Symbol (Symbol2Symbol2)
Webdings, Webdings (Webdings2Webdings2)
Wingdings, Zapf Dingbats (Wingdings2Zapf Dingbats2)
MS Sans Serif4Genevasans-serif
MS Serif4New York6serif

What if your Client Doesn't have the font you selected for display?

Give them an alternative using a Font Stack!

EG… { font-family: Zapf Chancery, Brush Script MT, cursive;}

Which font do you see?


Font Stacks

With CSS you can use a "font" stack that lists first the font you want the web page to display, The font stack then lists several alternate fonts that have similar"font faces" matching YOUR main choice. It is always best to end the list using the default generic name for the font-family like serif, sans-serif, monospace, cursive and fantasy.

A Font stack, looks like this in CSS

h1, h2, h3, h4, h5, h6, p {font-family: Arial, "Helvetica Neue", Helvetica, sans-serif; }

h1, p {font-family: Tahoma, Verdana, Segoe, sans-serif;}

The above Font stacks were generated from the web site http://cssfontstack.com They did all the work for you… finding fonts with similar font faces and making the stacks. All you need to do is copy and paste and put a comment (in your source) in your web page giving then credit.

Your Web Editor may already have a list of Font stacks ready for use:

An Example from Dreamweaver: {font-family: Cambria, "Hoefler Text", "Liberation Serif", Times, "Times New Roman", serif; }

Note that if the font name has spaces in it you must enclose the entire font name in quotes e.g.:  "New Times Roman"

An Example From CoffeeCup's Font Wizard : {font-family: "Franklin Gothic Medium", "Franklin Gothic", Arial, sans-serif;}, but you get to build the stack yourself…

Font stacks are perfect candidates for "snippets" 

A really good guide or primer about font stacks can be found at http://coding.smashingmagazine.com/2009/09/22/complete-guide-to-css-font-stacks/

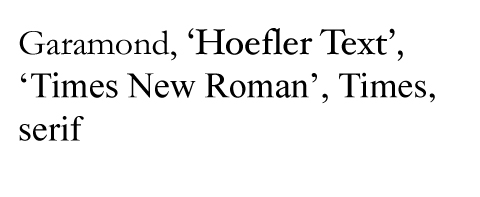
They have some really nice lists of font stacks with renderings of what the fonts look like

for example:


Here are some listed for body text:

  • Baskerville, ‘Times New Roman’, Times, serif
  • Garamond, ‘Hoefler Text’, ‘Times New Roman’, Times, serif
  • Geneva, ‘Lucida Sans’, ‘Lucida Grande’, ‘Lucida Sans Unicode’, Verdana, sans-serif
  • GillSans, Calibri, Trebuchet, sans-serif
 

NewImage

This web page let's you select fonts, change their attributes,  and it will display them so you can compare and see what they look like… http://www.typetester.org If you are really into fonts you'll love the Typetester Generator.

For Example, this is the css I setup for Tahoma

CSS OF THE 3RD COLUMN’S SETTINGS

font-family: Tahoma;
background-color: #fff;
color: #444;
text-decoration: none;
word-spacing: normal;
text-align: left;
letter-spacing: 0;
line-height: 1.5em;
font-size: 1.6em;s you can see from the CSS you can fiddle with more than just a "Font Stack"

Public Domain Fonts

A good place to start is with Google's Font Directory

In 2010 when Google first started this project they only listed 23 fonts… They now list 501, oops now it's 626 font-families! Google provides you with the Markup that you'll need to snip and paste to embed the fonts into your web pages.  Google is also working with Type Kit to make some of their fonts available for your use.

You don't have to "download" the fonts… Instead  you paste a script (the embedded markup) that goes out and gets the font from Googles servers so that your client's browser can display 'em…  However, you can only see these fonts while on-line.

<html>
  <head>
    <link rel="stylesheet" type="text/css" href="http://fonts.googleapis.com/css?family=Tangerine">
    <style>
      body {
       font-family: 'Tangerine', serif;        
font-size: 48px;
text-shadow: 4px 4px 4px #444;
      }
    </style>
  </head>
  
<body>
    <div>Making the Web Beautiful!</div>
  </body>
</html> 
add a text shadow and you get

Layout006

See https://developers.google.com/fonts/docs/getting_started for more details


Professional Font Foundry's

TypeKit  offers a service that links you up with font foundries and the fonts of course...

TypeKit also offers "free" fonts for your use... You can use their Free service to try out their font service

You'll have to sign up for a free account, but the result may be "Font Relief!"

Screen shot 2010-10-18 at 12.13.09 AM.jpg


Screen shot 2010-10-18 at 12.35.01 AM.jpg


Have fun with fonts!

Got a question or comment? You Know 'holler~


CSS3 Resets and Customizing your Typography

The Question in class was, "How do you control the spacing between headings, paragraphs and other text on a web page?"

When you are setting up a web page you might consider using resets… the resets remove the default spaces between headings and paragraphs and they do more… the resets make your web page look uniform across browsers…

The web site CSSRESET has a collection of presets for you to try out cssrest.com and use.

One of the template css pages  "basicCSSpage" in your class Master website folder uses the following presets: (without the Universal selector "*")

<style type="text/css">

/* I demonstrated the universal * reset    * {margin:0; padding:0;}  in class you can see what it does below… */

* {margin:0; padding:0;}

html, body {

margin: 20px;
padding: 0px;
border: 0px;
color: #000;
background: #fff;}

html, body, p, th, td, li, dd, dt {font: 1em Arial, Helvetica, sans-serif;}

h1, h2, h3, h4, h5, h6 {
font-family: Arial, Helvetica, sans-serif;}
h1 { font-size: 2em; }
h2 { font-size: 1.5em; }
h3 { font-size: 1.2em ; }
h4 { font-size: 1.0em; }
h5 { font-size: 0.9em; }
h6 { font-size: 0.8em; }
a:link { color: #00f; }

a:visited { color: #009; }
a:hover { color: #06f; }
a:active { color: #0cf; }
</style>

Setting up your Typography  

One of the things you should do is look at the fonts you want to use and the sizes you want them to display on your web site.

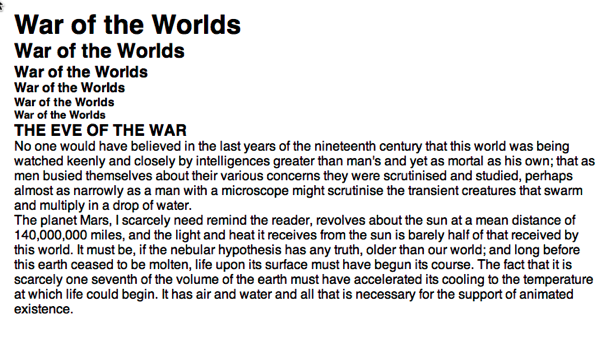
The following is how the above styles sets the  headings and paragraphs you see here…


Layout004

More on fonts and fonts stacks next

Thursday, May 30, 2013

Setting up a comments section on your web site

Make your web site interactive.

It's way for you and your clients to interact, with questions about your products, getting testimonials about your products, or just plain solving a problem or questions your clients may have.

If comments are open to the public, it's a good idea for you to be able to moderate the comments. 

I found 2 solutions that work well…

One is from Hub Pagesand it uses PHP and SQL

The other is from JSWidget.com. it uses Jquery and an xml file to store the comments.

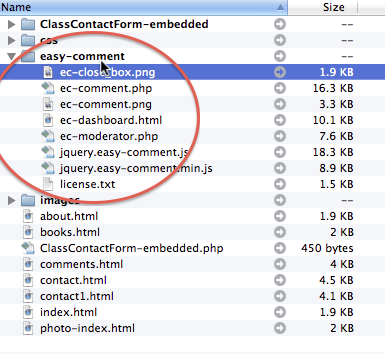
Here's How to setup up Easy Comment 

Download the following file, easy-comment.rar (25 KB) (the files are already in the week7 folder on your flash drive!)

and un-archive it (double click the file)

In your Local website Master folder, copy the folder easy-comment and it's content

Layout002


In your comments  page you need to do the following.

Between <head and </head>

place the following:

<script type="text/javascript"
src="http://ajax.googleapis.com/ajax/libs/jquery/1.5.2/jquery.min.js"></script>

<!-- Below the red URL is the full path to the location of the file jquery.easy-comment.min.js in the easy-comment folder on your remote server -->

<script type="text/javascript" 

src="http://www.uofgts.com/BasicWD/easy-comment/jquery.easy-comment.min.js"></script>
<script type="text/javascript" src="easy-comment1/jquery.easy-comment.js"></script>
<script type="text/javascript">
jQuery(document).ready(function(){
// Your other javascript code if any  <!-- #my-comment is the name of the id of the box where you want your comments to appear, see below between <body> and </body> -->

$("#my-comment").EasyComment({
path:"easy-comment/", // is the path to the folder where you put the easy comment files relative to the file that contains the comments
moderate:true,  // If you don't want moderation change to false
hasSubject:true, // If you want a Subject line on the form
maxReply:10 
});
// Your other javascript code if any
});
</script>

<body>

<section id = "content">
<h2>Adding Interactive Comments to your web pages</h2>
<p>Go a head! Leave a comment! In the Jquery setup below!</p>
<!-- This where your comments will appear -->
<div  id="my-comment" style="width:540px;height:800px; "></div>

</section>

If you need to moderate the comments change email address in the file "ec-comment.php

(it's just a text file) on line 38

$moderator_email = "your@address.com";

Pretty easy!

Enjoy!!!  Got a question leave a comment!


Monday, May 27, 2013

Using FTP Programs and upload/download managers

Local remote copy


1. Using FTP Programs

On the class disk you'll find an FTP Program (File Transfer Protocol). It's a utility program that is designed to upload/download web assets. It's Called Filezilla, and it's FREE (Open Source)

You can download FileZilla for PC or Mac from here… FileZilla

You can find DETAILED instructions on how to use FileZilla at this URL http://uofgts.com/BasicWD/lesson04.html

You can also find a FileZilla tutorial here… http://wiki.filezilla-project.org/FileZilla_Client_Tutorial_(en) 

2. Site Managers

Most web editors have ftp programs built in to Manage web site files… However the free CoffeeCup Editor does not have the capability to do ftp. That capability is reserved for the commercial version of Coffee Cup.

If you are using Dreamweaver, you'll find some excellent videos at Adobe's Web site
How to set up your "local" files and your remote server.
 
Defining a site in Dreamweaver http://adobe.ly/16KZlHv 
Working with files in Dreamweaver http://adobe.ly/18iAk5O
Connecting and Working with remote files http://adobe.ly/121AF9t

Enjoy!!!


Reply here or Bring your questions to class.

Forms, making them work for you to generate Data...

Using Forms

There are lots of free forms available for your use on-line… Nice!

Except most of the time they don't tell you how to use the form, or charge you an arm and a leg, so you can collect the information you are looking for.

Rent-a-form from 3rd Party Forms Services

 On this page you can find examples of working Simple Forms

In the Text Book, Build Your Own Web Site The Right Way, Ian Lloyd recommends using an On-Line Form service "Freedback.com"

They allow 1 free form with a six month life span:

Unlimited questions per form
Unlimited submissionsSpam filtering
Submission notification emails
Ad shown after form submission

Ian then goes on in Chapter 7 and shows you how to edit the Freedback Markup, for your own purposes…

Other 3rd Party Services include:

http://www.emailmeform.com

This is their free offer

  • Forever Free

    Unlimited Forms

    50 Fields

    100 Submissions / Month

  • 1 User
  • 1 Theme
  • 1 Report
  • 50 MB Storage Limit

Conclusion

The limiting factor of the on-line form generators is the amount of submissions you can receive from potential clients.  And, buying their services can get expensive real fast.

The Coffee Cup Database using Web Form Builder (for PC or Mac)

One of the nice things about the Coffee Cup Form Builder is that it delivers you your Data in a Safe & Secure way…

You can get the Data in e-mail, online or saved to a CSV text data file or for the advanced user you can send the data directly to an SQL Database Server. THe best part, if you choose the option to save your data to a .csv file or to your sql server, There is NO addition fee. For example:

You get the e-mail, that someone filled out your form!

Hey

there,

Someone filled out your form, and here's what they said:

Name: Ferdinand Feghoot IV
Email: galacticgarry@gmail.com
Web Address: uofgts.com
Comments or Questions welcomed!: To save form results in a text file, check the box marked save to a text file and enter a desired file name in the input box. The data will be recorded to a CSV file in the folder on your web server that contains the Web Form Builder files.

You'll find the form on your website, the path will look something like this...

"name_of_Form"/storage/csv/form-results.csv
Submitted On: 2013-05-27 01:47:35
IP Address: 24.21.46.58

Note: Customizing your email message is as easy as 1-2-3! To get started, edit your form and go into the Settings > Email Notices Tab and then click on "Configure email message". Web Form Builder supports HTML and CSS so there is no limit to how snazzy you can design your message. For more info go here. Hope you're enjoying the software!

The .CsV data looks like this, it is in a comma delimited file, understood by database and spread sheet programs…

name_field,email,url,comments_field,recaptcha,_submitted_,_fromaddress_
gts,galacticgarry@gmail.com,uofgts.com,"noon test",,"2013-05-23 11:59:11",24.21.46.58,
"Ferdinand Feghoot IV",galacticgarry@gmail.com,uofgts.com,"To save form results in a text file, check the box marked save to a text file and enter a desired file name in the input box. The data will be recorded to a CSV file in the folder on your web server that contains the Web Form Builder files.

You'll find the .csv form on your website, the path where the form is located will look something like this…  it's in a folder with the name you gave the "Form" …

"name_of_form"/storage/csv/form-results.csv"

Which can be pasted directly into a spread sheet.

Layout002

When the amount of data you are collecting becomes difficult to manage, it is time to set up an sql database… 

This aspect of web work is beyond this class… (this really Geeky stuff)

You'll need to have a Host that supports SQL databases…  You'll also need to set up a "test server" or convert your local computer into a "server".

you'll also need to install a database on your local computer and a database front end like phpmyadmin… 

If you have a Mac you can turn your Mac into a server… You'll find instructions here…

 http://www.coolestguyplanettech.com/how-to-install-php-mysql-apache-on-os-x-10-6/

adding  phpmyaddmin

http://www.coolestguyplanettech.com/installing-phpmyadmin-on-mac-osx-10-7-lion/

OR FOR THE PC (And Mac)

  A much easier way to turn your Mac or PC into a server is to install Xampp for the PC or Mac http://www.apachefriends.org/en/xampp.html 

or Mamp for just the Mac

 Yes, it really is geeky!

Another good Form Alternative 

If you want to build your own forms and learn how they work, a good alternative is Jame Huggin's Free Form

 http://www.jamesshuggins.com/h/hefs/hefs-example-1.htm

He provides a free detailed manual that takes you step by step through the process of setting up a safe and secure form. It'll take a bit of work!

Here's an example 

I think you'll agree,  the Coffee Cup Form Editor is the best alternative for beginning web builders! And, it's available for both PC and Mac

Next: a quick review of how to upload and down load to your remote host server… using ftp/sftp.


Friday, May 24, 2013

Forms

Here's an example of using a form to gather information, or have your users interact with a "fun" survey… the possibilities are endless.  It took just a few minutes to set this up on Google.  


Here's an online article  8 Killer Web Form Builders for Your Site

Next: How to collect Data in a database .CSV format using a Coffeecup Pro generated form.

I'll use the form here as our "test" form.

Stay Tuned

Even More on Transparency

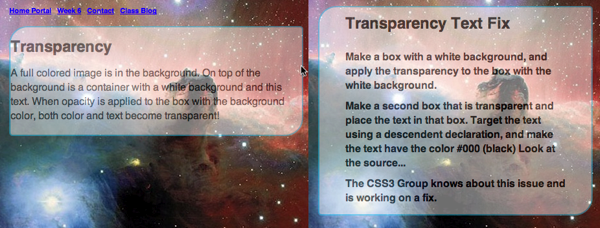
Seems there is an issue with transparency that we all should be aware of…

Layout001


Transparency applied to a "box" with text will cause the text and background color to be transparent… There are several work arounds… You can see my test page here, look at the Source to see the solution.


Also, be aware that the Previews in your web editors may not display the markup they way it appears in a web browsers. Remember, test early and test often.  You can use the web site Saucelabs.com to test your web pages for the "other" platforms.


Monday, May 20, 2013

Week 5 Review...

CLASS #5 tip: When designing your web pages… Always ask yourself these questions: Where am I? Where have I been? Where can I go?

 Layout Out Your Master Web Page

Continuing Beyond the Banner

 So far in our tutorial we have built a banner, added some embellishments and added our menus. This is the page

http://uofgts.com//BasicWD/ClassTest-Site/index.html

If you look at the source of the "index.html" page we are building… you'll notice I kept the html simple, one element following the other…

Layout001

If you have a Mac use Safari  to see the source…  it's the Menu: Develop > Show Page Source. For Firefox it is View >  View Source Chart 

You will also find the files in your class week 5 folder!

Read the source files… there are some useful tips like

<!-- Note the copyright meta statement… for now it looks like this  -->

<meta name="dcterms.rightsholder" content="Copyright (c) 2013 Stasiuk Enterprises, all rights reserved.">

<!-- We Switched our stylesheet from embedded to an external text file with the extension .css -->

<link rel="stylesheet" type="text/css" href="css/main.css">

 
There is more… 

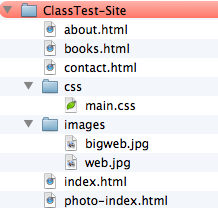
When you have done the layout of your main web page you can make copies of your index page and re-name them, to match your menu items… Your website Master folder should now look something like this… verify that the links work!

Layout003

Making Contact!

Using the Mailto: mail client popup

here's the markup… click on the links below… if you use an email program (client) you'll see the different possibilities… 

A simple mailto link:
<a href="mailto:info@example.com">mail link</a>
mail link

mailto link with subject:
<a href="mailto:info@example.com?subject=email%20subject">mail link</a>
mail link

mailto link with multiple recipients:
<a href="mailto:info@example.com,email@example.com">mail link</a>
mail link

mailto link with a CC:
<a href="mailto:info@example.com?cc=email2@example.com">mail link</a>
mail link

A mailto link with message body already started:
<a href="mailto:info@example.com?body=these%20mailto%20links%20are%20cool"> e-mail link</a>
e-mail link

A mailto link with 3 lines of message body:
<a href="mailto:info@example.com?body=these%20mailto%0Alinks%20are%0Acool"> mail links</a>
mail links

Warning!

If you do NOT encode your e-mail address you'll get a lot of spam!

Contact Us! how to setup the mailto Link… 


<a href="mailto:someone@microsoft.com"> Contact Us</a>

If the user (your client) has a default e-mail program like Outlook Express, or Mail, clicking on the "Contact Us" link will start-up their e-mail program and insert AN e-mail address. Contact Us.

But this method exposes your e-mail address to "spam robots" that search web pages looking for bare e-mail address. They "harvest" the e-mail address and sell them to spammers... To protect yourself you need to hide your e-mail address with encoding.

Spam bots by the way can read the source, but they cannot read a rendered web page the way you see it in a browser!

Time to get out your secret decoder ring!

Here's an example of an encoded e-mail address:

eg:

user@somedomainname.com

is replaced in the markup with something like:

<script type="text/javascript">
//<![CDATA[
eval(unescape('%76%61%72%20%73%3D%27%61%6D%6C%69%6F%74%75%3A
%65%73%40%72%6F%73%65%6D%6F%64%61%6D%6E%69%61%6E%65%6D%63%2E%6D%6F%27%3B
%76%61%72%20%72%3D%27%27%3B%66%6F%72%28%76%61%72%20%69%3D
%30%3B%69%3C%73%2E%6C%65%6E%67%74%68%3B%69%2B%2B%2C%69%2B%2B%29%7B%72%3D
%72%2B%73%2E%73%75%62%73%74%72%69%6E%67%28%69%2B%31%2C%69%2B
%32%29%2B%73%2E%73%75%62%73%74%72%69%6E%67%28%69%2C%69%2B
%31%29%7D%64%6F%63%75%6D%65%6E%74%2E%77%72%69%74%65%28%27%3C
%61%20%68%72%65%66%3D%22%27%2B%72%2B%27%22%3E%75%73%65%72%40%73%6F%6D
%65%64%6F%6D%61%69%6E%6E%61%6D%65%2E%63%6F%6D%3C%2F%61%3E%27%29%3B'))
//]]>
</script>

The above is an example using a plugin in the Mac web editor: Coda, it's called "Emcoda"

Here are some links to web sites that can do the encoding for you. You save the result as a "snippet" and use it later, any and every time you need to add your e-mail address to a web page. You really don't want spam!

All you need to do is "Cut" and "Paste"

Some sites use simple character encoding and others offer javascripts like Emcoda

http://www.iconico.com/emailProtector/

http://www.wbwip.com/wbw/emailencoder.html

http://www.dynamicdrive.com/emailriddler/

 A better "Contact Us" solution is to use "Form Mail" and/or Social Media

That's coming up next!


Thursday, May 16, 2013

Backgrounds and Transparency

Backgrounds

Seemless backgrounds are easy to implement and they load fast! Click on the backgrounds…

Back 5Back 2Star bak 

I made these along time ago… using my Amiga and a program called ImageFX… They tile without visible edges. The first one is "embossed", a nice watermark effect!

If you use the .gif file format you can animate your background (animation is one of the capabilities of the .gif file format…) I found this twinkle star pattern on the web and use it for my home portal page, yep who can resist twinkling stars!

Starsglow1

You can find many "free" and "Royalty Free" seamless backgrounds on the web.

Just search using the following key words free seamless web page backgrounds

You use CSS to place the backgrounds (Yes you can have more than one background on a page!)

with a declaration in the body selector …  you can also put backgrounds in divs, paragraphs, etc.,

body { background-image: url("images/darkpattern.png"); } 
div { background-image: url("images/foo.png"), url("images/bar.png"); } 
p { background-image: none; }

Full Page Backgrounds

In The "Wrapper"

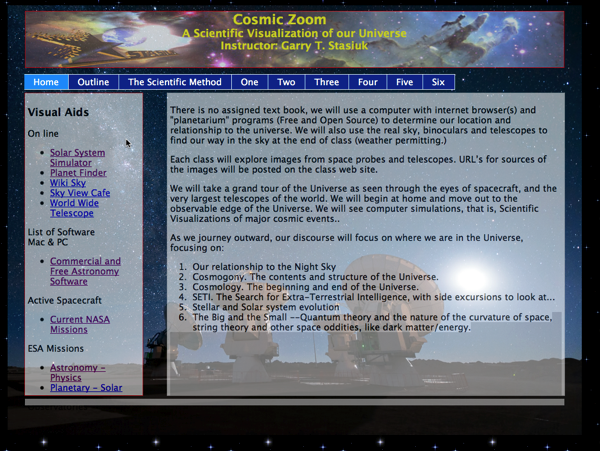
On my Astronomy Class Portal Page I placed a "full" image in the background in the div "wrapper" I wanted to use an image that would fire up your imagination, but to "see" the image the aside and section content areas  had to be transparent…

Astro bak

#wrapper {
position: relative;
background-image: url(images/wrap-bak3.jpg);
margin: 10px auto 0 auto;
width: 1024px;
height: 768px;
}

aside {
 color: #000;
 background-color: #fff;

/* for IE */
filter:alpha(opacity=60);
/* CSS3 standard */
opacity:0.6;
}

section {
color: #000;
 background-color: #FFF;
margin: 0 30px 0 5px;
/* for IE */
filter:alpha(opacity=60);
/* CSS3 standard */
opacity:0.6;
}

Straight forward stuff. There is a usability issue here… this concepts works as long as the text is readable!

Image Backgrounds Beyond the Wrapper…

For the first revision of my Curling website way back when (5-6 Years ago) I made a  background that looked like this

I made it 1650 x 1050 pixels 

Bg2

In a browser it looked like this… sorta I don't have the old css for the <header> easily accessible, but you get the idea…

Layout002

To position the graphic I used a background-position declaration for the background image…

body {
color: black;
background-image: url(/images_global/bg2.jpg);
background-repeat: repeat-y;
background-position: center top;
font-family: Tahoma, Arial, sans-serif;
margin: 0px;
padding: 0px;
}

Other Background Image uses

I first saw this concept at a Science Fiction movie/tv review website and used the concept for my curling website

http://www.mania.com/science-fiction-television-anime_category_67.html

The Winnipeg Free Press is putting advertising in the background… Now that's going beyond the edge!

Layout003Layout004

Tuesday, May 14, 2013

Inserting interactive elements on your web pages

How do you make your website interactive?

Insert a contact form. Or Insert a signup form for a newsletter.

Have an event coming up, sell tickets using a form, use an "event" service…

We'll also hookup your site to Facebook and Twitter.

Making forms is one of the hardest things to add to a web page, but Coffeecup software has a free "app" for either the Mac or PC called Web Form Builder Lite.

http://www.coffeecup.com/web-form-builder-lite/

Download the version for your your Mac or PC and try it out…

I'll show you how to make a form with it in class

Here's an example 

Use this link to see it on Coffeecup's "free S-drive" 

Send me a comment using the form!

Friday, May 10, 2013

What's the big deal about html5/CSS3?

In the Banner Tutorial we used a gradient graphic made in Photoshop. You can do the same thing in html5/CSS3 with markup.

And, you don't even have to write the markup, you just need to be able to "Cut" and "paste"

To find out more check out this web page.  Placing a gradient in the banner/header


Thursday, May 09, 2013

Week 4 Review

In the classroom we all used Dreamweaver on the Mac, there are only a few minor differences between the mac and PC version. The basic one is that on a Mac the control key and a mouse click is the right mouse button on the PC… 

Building a Website, the tutorial, using positioning rules to place content on a web page, and building menus. 

Layout Review

Using the Position Rules

The basic thing to remember here is that the "left" side and "top" of a web page are fixed, the (zero, zero) co-ordinates are at the top and left corner of ANY web page.  So when you position any element it is always from the "top;" and/or from the "left:"

Building a Web Page Tutorial begins with the "Building a Banner Tutorial" inserting -images & backgrounds into the <header> (banner) of your web page.

This tutorial uses html5 , the first 7 pages deal with just the <header> (the banner)
Building a web Page -- The Banner Tutorials

Please note: You can always start with an existing pre-formatted layout, This will jump start your web page building.  There are several in your Master website folder!

Homework, use the following layout to build a banner in Dreamweaver. You can download and use Dreamweaver for free, for 30 days…. give it  a try!

  1. Use this layout generator---  CSS Layout Generator it can make equal height columns regardless of content… This is an example…URL is http://uofgts.com/BasicWD/layout/index.html It is also in your week 3 folder! 
  2. Add YOUR content for the JUST the header (banner)

Making Menus

Making menus is one of the hardest thing to do… it's quite time consuming!

You will find many easy ways to get you going, "jumpstart" your web page.

  1. Make Your Own Menus!
  2. Menus come in 2 parts. Part 1 is an HTML list that goes between <body> and </body>. Part 2 is the styling the CSS that goes between <style> and </style>. 
  3. You may use the The Menu Tutorials (There are cut and paste examples)
  4. In class we used Ian Lloyd's The List-o-matic menu generator List-o-matic
  5. Don't like List-o-matic Try this generator  Pure CSS Generator it's free, they sell downloadable software, but for our purposes it is not necessary to buy… just use the online generator!
  6. Make menus for Home, Contact, About and Products and or the purposes of your web site.
  7. Insert the menus on your web page (see the web page tutorials page 8)
  8. Once you have inserted your menus you can Now duplicate your index.html page , and rename them: about.html, contact.html and products.html, etc…
  9. Congratulations, you now have the beginnings of a web site!

For those of you that want to continue further …You can use Wizards and Widgets to embellish your web site!
Web Tools, Wizards and Widgets


On-Line and desktop References for html and CSS

CSS at Sitepoint.com

HTML at Sitepoint.com

Sitepoint also offers a "plug-in called Code Burner, it's a quick interface that resides on your desktop or in your FireFox Browser. It is linked to the Sitepoint on-line references for CSS and HTML. Check out Code Burner!

Graphically Challenged?

The Cool Text web site will help you design a logo. The Cool Text Wizard


Gota question? 'Holler

Thursday, April 25, 2013

Week 2 Review -Formatting your content

Class Objective

To build a web site consisting of at least 3 interactive web pages.
This weeks Goal
  • --Add content and format  with xhtml (html5)
  • --Adding images to a web page

The xhtml rules

html elements are the building blocks of a web page. You can find a really good html reference guide at Sitepoint.com
The building blocks of a web page are html(5) elements The graphic shows the structure of an element using the heading element which is made up of an open tag <h1> and a closing tag </h1>
(Your content goes between the tags)


Before you can add html elements to a web page you need to know the basic rules!
http://uofgts.com/BasicWD/xhtml.html
Oh no, more rules! A few more things you need to know before we begin making a web page.
TYNTK
Add your content for your web page using the Web Editor of your Choice
Using a blank html5 page, you can find one in your Master Site folder named Basicxhtml5page.html
Use it in your web editor to add your content in the order you want to see it displayed on the page
How? Just following the tutorial (link below) on how to add content and format it.
Got a question, send me an e-mail!
This is the link to the tutorial Building a Web Page-- How to add and format the content
(You will also find the above web tutorial page in the class folder named week2… its named xhtmltut.html )

HomeWork

after you do the above tutorial work on the following
1.Try to Insert your content into an html5 pre layout
html5-3col.html
or
html5-2colindex.html
Those two files are already in your master folder!
2. Have some fun and Play with Sumo Paint or Pixlr and try to make an image or graphic or logo
AND add it to your web page content!
Image editors for everyone… SumoPaint or Pixlr
Free online paint programs.
If you are ready to place pictures on your web page read How to Insert an image on a web page How to Insert an Image
For information about adding color to your web page check out Inserting color
Most of all have fun!

Saturday, April 20, 2013

Setting up web editors

Trying out web editors

Any time you try out a new editor make sure the software knows where your Master Website folder is located… all of the programs will work better if you set up the master local site first.

Here's some help with the Coffeecup editors

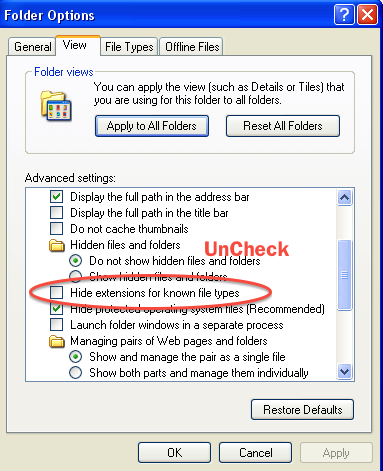
But, First: Make Extensions visible in WindowsXP, Vista, Win7 or Win 8

Mac and Windows OS's by default hide the 3 letter file extension for all files…  the extensions are part of the filename, the extensions tell web browsers to do with the file… Here's how you set that up…

On Windows XP

  • Open My Computer, and select Folder Options from the Tools menu
  • Don't see Menu's, press the Alt key
  • Click on the View tab, turn off Hide MS-DOS file extensions for known file types, by unchecking the box
  • Press OK.

On Windows Vista

    • Go to My Computer and choose Organize > Folder and Search Optionsv
    • Select the View tab and deselect "Hide extensions" for known file types
    • Press OK.

On Windows 7

  • Open an Explorer window and choose Organize > Folder and Search Options
  • Select the View tab -- and deselect the Hide extensions for known file types
  • Press OK.

Same for Win 8

Folderview

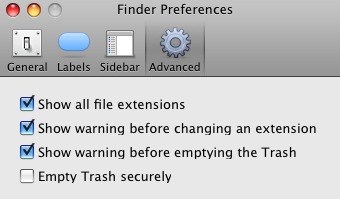
Making Extensions visible in OS X (Mac)

Finderprefs

  • open the Finder, then choose Menu Finder > Preferences
  • Choose the Advanced Tab
  • Check the Show all file extensions box


The extensions to tell us and the browsers which files are web pages, graphics or scripts)  The extension for a web page is .html or .htm Use one to the other, but be consistent! Graphic or picture files recognized by a browser use the extensions .jpg, .png or .gif, a new member of the graphic family is .svg.  Script files usually have the extension .css, .php, .js, or .cgi (there are many others).

Setting up Windows Coffee Cup Web Editor

The files in Your-Master-Site folder are called "Local" files, these file will eventually be uploaded to your "Server". The files located at the server are called "Remote" files

You can setup The CoffeeCup HTML editor using the menu item

My Websites > Website Project Settings…

You'll see this requester (If you need further help click the question mark)

MywebsitesProject settings


1. Give the project a name   2. Use the "browser" to locate Your-MasterWebsite folder on your flash drive

That's all you need to do for now. We'll set up the servers later…

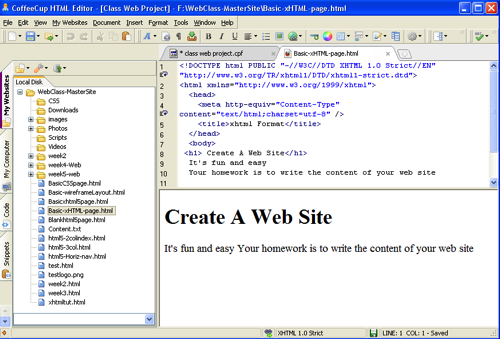
In Coffeecup you'll see what's in the Local site folder on the left.

Windowsditor


Setting up a Mac for Coffeecup's Web Editor

It's a bit easier ???

In the Web Editor choose the menu item

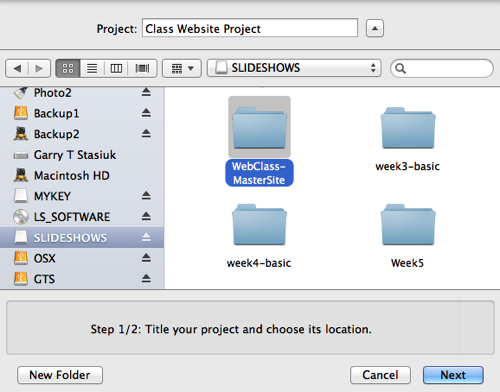
File > New Project  > From Files and Folders

You'll get a Finder requester… Browse to your Local Site folder on your Flash Drive

But, title your project first…

Layout005

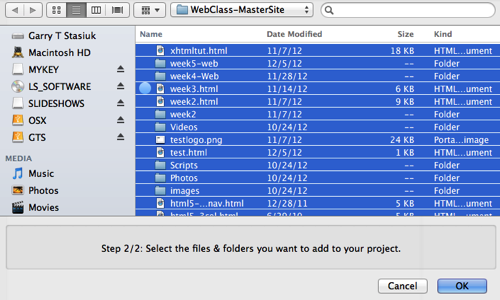
Then open the local site folder

and click next

Layout006

Highlight the files you want to edit or open and click okay

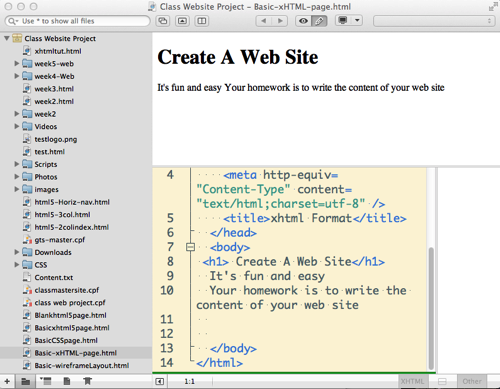
Your Web Editor will look like this… (well sorta… )

Layout007

and have fun!

We'll go over this in class… When we are ready we'll link your web editor to your hosting server!


Friday, April 19, 2013

Recommended Text book

I highly recommend

Start Building Web Sites Like a Pro!

BUILD YOUR OWNWEBSITETHE RIGHT WAYUSING HTML & CSS, 3RD EDITION

BY IAN LLOYD

 You can download a sample chapter at

http://www.sitepoint.com/books/html3/?SID=30d796cee0d8a39c91d9015939a2ad7e

On Your Flash(thumb drive)

You'll find a synopsis that Ian Lloyd wrote about this book (for The First edition) in the folder on your flash drive TheRightWay-shortversion.pdf, you'll also find the book sample there too… for Version 3… TheRightWay-booksample2-8-12.pdf

Reading assignment!  Read Chapter 1.

You can purchase the book or an e book version of the book at Sitepoint.com.


Welcome to How to Create A Website

Web Browsers (Test Early, Test Often)

Turns out Apple Dropped support for the Window's version of Safari.  There is a version available, but it was last updated in July of 2012… 

If you have a PC, to test your web page to see what it looks like on an Apple Computer using Safari, you can use a Web Site teasing service at Sauce Labs https://saucelabs.com

This links takes you to a list of Web Browser publishers Download browsers! Install them!
  1. The Web Editors

    If you already have a Web Editor, by all means, use it! The following is a link to a web page that discusses the various kinds of web editors and give you some choices. The goal here is to find a web editor that you like, and that will help you build your web site. The Web Editors

    We'll start of using the HTML editors from Coffee Cup so you can get familiar with how html editors work..  You can always download and use these editors for free for 30 days or so…

    Windows:  Coffeecup HTML Editor

    Mac:  CoffeeCup HTML Editor

    Homework:  

    The write out Content and or ideas you want to see on your web pages…

    You can start off with a pencil and paper!… Then write it out in a text editor. 

    Go a head and install one of the above and try using it to write out your content…

    Save the file as a .txt file and put it in your master website folder. We'll use it in class…

     Most of all have fun! Get stuck, send an e-mail…

    Navigation Links for what was discussed in class

    • Week 1 (That's this page on my web site at the bottom of the page you'll see an RSS News feed that displays links to the last 5 articles on the class website blog)
    • Home   (Class Portal page)
    • Lesson 1 (Interesting stuff)
    • Domains and Hosts
    • Resources 
    • Contact

    Some Vocabulary 

    URL ---Uniform Resource Locator
    HTML & CSS
    --- HTML, Hyper Text Markup Language, creates the headings, paragraphs and other content for  a web page.
    --- CSS, Cascading Style Sheets, Creates the Styling for a web page.
    Provider
    --- Physically links your computer to the Internet.
    Host
    --- Provides the Computers (servers) to store and host your web site on the internet.
    Domain Name (Server) (DNS)
    --- makes a recognizable name for the actual numerical Internet address.
    Got a question? Send me an e-mail